If you'll be installing or maintaining a Local Area Network (LAN), one of the most important things for you to know is how to terminate Cat5, Cat5e, Cat6 and newer network cables with RJ45 connectors. Rely on our step-by-step guide to take you through your project.
PROJECT CHECKLIST
|
|---|
| Experience Level: Advanced |
| Time Required: 5-10 Minutes |
| Steps: 9 |
| Supplies: EZ RJ45 connectors (2 per cable), Modular Crimping/ Cable Cutting tool,Wire stripping tool |


STEP 1
Using a Crimping Tool, trim the end of the cable you're terminating, to ensure that the ends of the conducting wires are even.
STEP 2
Being careful not to damage the inner conducting wires, strip off approximately 1 inch of the cable's jacket, using a modular crimping tool or a cable stripper.
STEP 3
Separate the 4 twisted wire pairs from each other, and then unwind each pair, so that you end up with 8 individual wires. Flatten the wires out as much as possible, since they'll need to be very straight for proper insertion into the connector.

STEP 4
Holding the cable with the wire ends facing away from you. Moving from left to right, arrange the wires in a flat, side-by-side ribbon formation, placing them in the following order: white/orange, solid orange, white/green, solid blue, white/blue, solid green, white/brown, solid brown.


STEP 5
Holding the RJ45 connector so that its pins are facing away from you and the plug-clip side is facing down, carefully insert the flattened, arranged wires into the connector, pushing through until the wire ends emerge from the pins. For strength of connection, also push as much of the cable jacket as possible into the connector.
STEP 6
Check to make sure that the wire ends coming out of the connector's pin side are in the correct order; if not, remove them from the connector, rearrange into proper formation, and re-insert. Remember, once the connector is crimped onto the cable, it's permanent. If you realize that a mistake has been made in wire order after termination, you'll have to cut the connector off and start all over again!
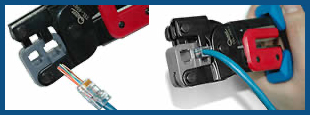
STEP 7
Insert the prepared connector/cable assembly into the RJ45 slot in your crimping tool. Firmly squeeze the crimper's handles together until you can't go any further. Release the handles and repeat this step to ensure a proper crimp.

STEP 8
If your crimper doesn't automatically trim the wire ends upon termination, carefully cut wire ends to make them as flush with the connector's surface as possible. The closer the wire ends are trimmed, the better your final plug-in connection will be.

STEP 9
After the first termination is complete, repeat process on the opposite end of your cable.
Shop at CableOrganizer® for wires, crimping tools, wire strippers, RJ45 Connectors and other cable management items.


